Gel nail polish has become a favorite among beauty enthusiasts for its long-lasting and shiny finish. Unlike traditional nail polishes, gel nails can stay intact for weeks, which makes them a popular choice for busy individuals. However, as time passes, it’s essential to remove the gel polish to ensure your nails remain healthy. In this comprehensive guide, we’ll cover how to remove gel nail polish safely and effectively, and how to protect your nails during and after the process.
1. Understanding Gel Nail Polish
Before diving into removal methods, it’s important to understand what gel nail polish is and how it works. Gel nail polish is a special type of nail lacquer that hardens under UV or LED light. This curing process creates a durable, chip-resistant finish, giving the nails a glossy look that can last up to two weeks or more.
Unlike regular nail polish, which air-dries, gel nail polish requires curing to achieve its strong, long-lasting bond. This durability is why gel nails are so popular, especially for people who want their manicures to last longer. However, the very nature of gel nail polish can make removal tricky if not done correctly.
Proper removal is essential because, if done improperly, the gel can damage the natural nail, leading to thinning or weakening. Additionally, leaving the gel polish on too long can cause discoloration or weakening of the nails. Therefore, understanding how gel polish is different from traditional nail polish is crucial when deciding how to remove it safely and effectively.
2. Different Methods to Remove Gel Nail Polish
There are several ways to remove gel nail polish, each with its own set of pros and cons. Let’s explore the most common methods to help you choose the one that works best for your needs.
Soaking with Acetone
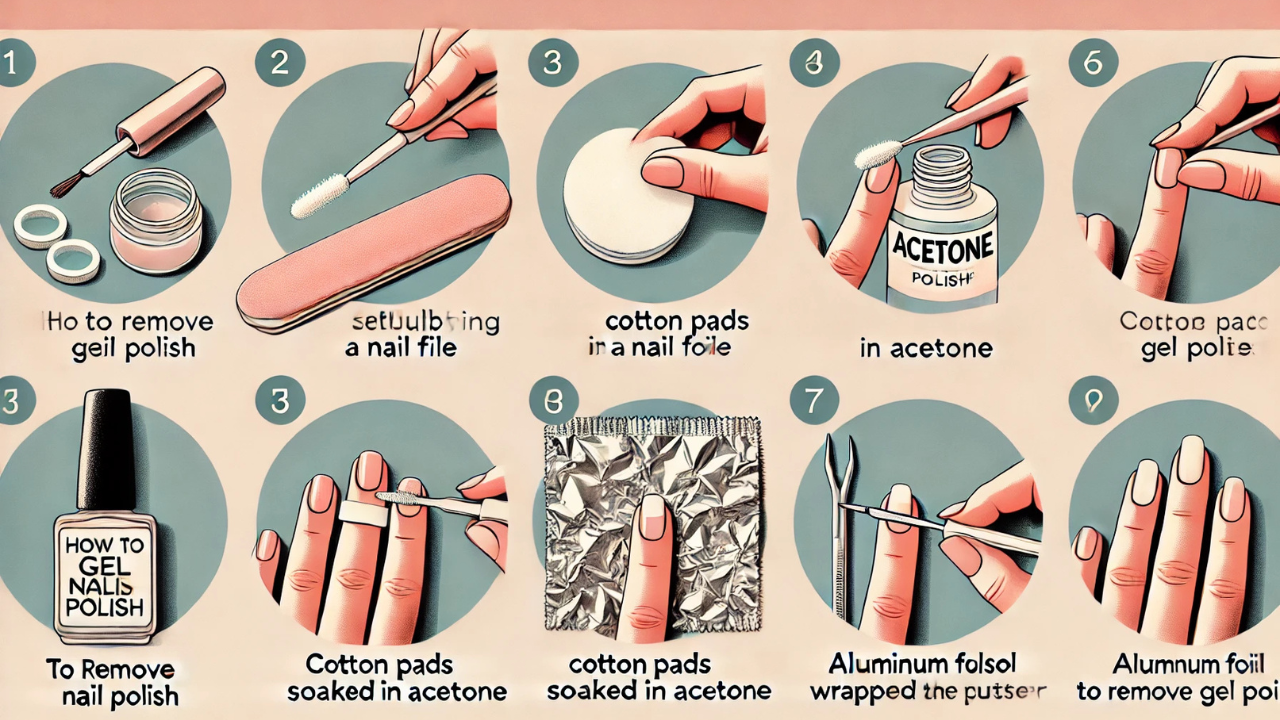
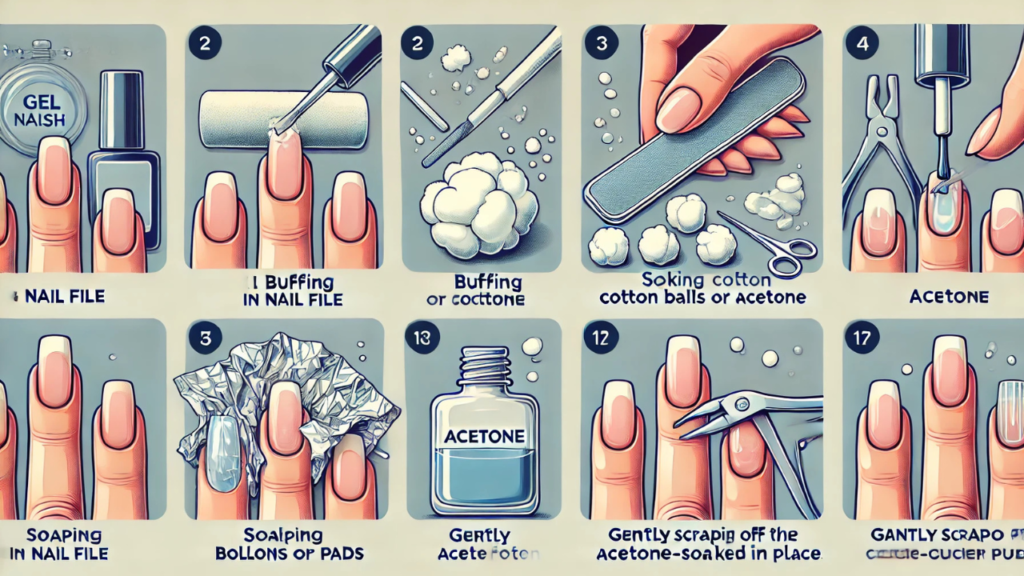
One of the most widely used methods for removing gel nail polish is soaking the nails in acetone. Acetone is a strong solvent that effectively breaks down the gel formula, allowing it to peel off easily. To remove gel nail polish using acetone, you’ll need a few supplies:
Cotton balls or pads: These will help soak up the acetone and cover your nails.
Aluminum foil: Used to wrap your nails and keep the acetone-soaked cotton in place.
Nail buffer or file: This helps remove any residue of gel left behind.
Here’s the step-by-step process for using acetone to remove gel polish:
Prepare your nails: Start by gently buffing the surface of your gel nails with a nail file. This will help the acetone penetrate the gel and remove it more effectively.
Soak the cotton pads: Soak cotton balls or pads in acetone.
Wrap your nails: Place the soaked cotton ball on your nail and wrap it with aluminum foil. This will hold the cotton in place and keep the acetone from evaporating.
Wait: Allow your nails to soak for about 15-20 minutes.
Remove the foil and cotton: After waiting, carefully remove the cotton and foil. The gel should have lifted or softened by now.
Gently scrape off the remaining gel: Use an orange stick or a cuticle pusher to gently scrape off the remaining gel. Be careful not to damage the nail bed during this process.
This method works well for most people, but if you have sensitive skin or nails, you may experience dryness or irritation, so it’s crucial to moisturize your hands and nails afterward.
Gel Nail Remover Kits
Another method to remove gel polish is by using gel nail remover kits. These kits usually include acetone or a similar formula that softens gel polish, along with tools like a nail scraper or cuticle pusher. Some kits even feature a heat source to expedite the process.
To use a gel nail remover kit, follow the instructions provided with the kit. These kits are often more gentle on the nails compared to pure acetone, as they may include moisturizing agents or other skin-friendly ingredients. However, be mindful that not all kits are created equal, and some may not be as effective at removing thicker gel layers.
Alternative Methods
While acetone is the go-to solution, there are alternative methods for removing gel nail polish, especially for those who prefer non-acetone options. Isopropyl alcohol and non-acetone nail polish removers can sometimes work, but they may require more time and effort. If you choose this route, soak your nails in a bowl of alcohol or non-acetone remover for an extended period (at least 30 minutes) before attempting to peel or scrape the polish off.
Another alternative involves gently buffing away the gel using a nail buffer. This method requires patience and should be done carefully to avoid damaging your nails. If you’re looking for a less abrasive solution, this might be an option worth exploring.
3. Aftercare for Your Nails
After successfully removing your gel nail polish, proper aftercare is crucial to maintaining the health of your nails. Gel nail removal can leave your nails a bit fragile, so nourishing them is essential.
Moisturizing Your Nails and Cuticles
Moisturizing your nails and cuticles is vital after the removal process. Acetone and other removers can dry out your nails and skin, leading to cracked cuticles or brittle nails. Use a rich cuticle oil or nail moisturizer to rehydrate your nails and skin. Applying these products daily will help restore the moisture balance and keep your nails strong.
Nail Repair
If you notice that your nails are weak or damaged after removing gel polish, consider using a nail strengthening treatment. Many brands offer nail repair solutions that contain vitamins, proteins, and minerals to help rebuild your nails. Regular use of such treatments will ensure that your nails recover quickly.
Avoiding Overuse of Gel Polish
While gel nails are a convenient option for long-lasting color, it’s important not to overdo it. Giving your nails time to breathe between gel manicures is crucial for maintaining their health. Overuse of gel polish can lead to thin, weak nails that are more susceptible to damage.
4. Preventing Damage While Removing Gel Nail Polish
Improper removal of gel nail polish can cause significant damage to your nails. Here are a few tips to prevent this from happening:
Don’t force it: If the gel polish doesn’t come off easily, don’t force it. This can lead to damage to the nail bed. Instead, re-soak your nails and try again after a few more minutes.
Avoid scraping too hard: While using a cuticle pusher or scraper, be gentle. Scraping too aggressively can damage the nail’s surface.
Use acetone carefully: Acetone is harsh on the skin and nails, so it’s essential to moisturize afterward. Overexposure to acetone can dry out your skin, so always apply a nourishing cream or oil post-removal.
Conclusion
Removing gel nail polish doesn’t have to be a stressful process if you follow the right techniques. Whether you choose to soak your nails in acetone, use a gel nail remover kit, or opt for an alternative method, always remember to follow up with proper aftercare to keep your nails healthy and strong. Regularly giving your nails a break between gel manicures is also key to preventing damage in the long run.
By being mindful of your nail care routine and following the right removal techniques, you can maintain beautiful, healthy nails that are always ready for the next manicure.
Frequently Asked Questions (FAQs)
How long does it take to remove gel nail polish?
Removing gel polish typically takes 15-20 minutes, depending on the method you choose and the thickness of the polish.
Can I remove gel nail polish without acetone?
Yes, you can use non-acetone removers or alcohol, but they may take longer to dissolve the gel.
Will removing gel nail polish damage my nails?
If done correctly, gel nail polish removal shouldn’t damage your nails. However, improper removal can cause nail damage.
How often should I remove gel polish to avoid nail damage?
It’s recommended to give your nails a break every few weeks between gel manicures to maintain their health.
Is there a way to speed up the removal process?
Using a gel nail remover kit with heat or soaking your nails in acetone with a heated towel can speed up the process.
Can I reuse gel nails after removing the polish?
Once the gel polish is removed, the nails are typically ready for a fresh coat. However, if the nails have been weakened, it’s best to let them recover first.
You May Also Read: https://ventsbuzz.pro/cameron-herrin/